|
|
| Fly
designs should duplicate the forage and movement of the quarry.
When I do want to produce a fly that bests simulates the motion
and hues of naturals; Angel Hair comes to mind. Angel Hair
captures the brilliance and iridescence of the underwater world.
Mixtures of material and light set off by motion make these
flies truly ignite. In the past, most of my work has been done
on smaller size profiles. I had on occasion tied larger
varieties, but longer than four inches or so and the material
lost its profiled shape while sinking.
And I really hated to lose Angel
Hair as a primary material on these larger profile flies. Using
only for accents just didn’t seem like the right way to go.
What I needed to do was sit down and roll up my sleeves and see
where I could make some design changes to better suit my needs.
That’s the neat thing about designing your own flies to suit
your own areas. So I did some tinkering here and there,
substituted different materials and modifying my tying
techniques and came up with this result. So here is what
transpired.
Bucktail
as a tail was substituted for the usual Ultra Hair. This is used to
separate the top and lower halves of the Angel Hair profile. The now
internal bucktail itself, acts like filler to prevent the Angel Hair
from minimize its’ size during the retrieve process. Most times the
bucktail used will be white, but any color will do if it becomes part
of the lateral lines of a baitfish. Mirage Flashabou was added above
the bucktail. The Mirage material now becomes a belt of glitter to
offset the other wise bright backgrounds. This also added some contrast
to the side profiles of the fly.
The first bunch of Pearl Angel
Hair was placed right above the bucktail tie. Subsequent shades
of colors were added all along the shank mostly on top but some
bottom. Placement of these ties lay just ahead and in front of
previous ties. I found the buildup of materials has to start
first at the bend of the hook and using 2X type shanks hooks
does not leave much area for buildup. Also, the shorter shank
hooks help minimize snagging of the material when fished. Be
careful to leave space toward the front to add the bucktail
collars to the eye of the fly.
What I came up with is a very
large profile glitter fly with some material stability. The
bucktail skirt acts like a restrictive cage to prevent the Angel
Hair from extending past the desired profile. The fly itself is
basically a sparse tied, larger profile fly that accents the
dominant markings of any baitfish. All missing materials of the
fly that would add bulk are naturally absorbed and camouflaged
into the ambient environment. For that reason, these flies are
easy to cast.
Angel Hair is a marvelous
material that fly tyers have had for a number of years now. This
synthetic material has both the seductive motion and
color-changing properties needed in fly designs. Over the years,
the material has proven itself as a fish catching magnet.
Patterns with Angle Hair have become mainstays in the arsenal of
many a fly tyer. Now it’s time to cage the material with
bucktail hair. Big fish eat big tantalizing bait. Now it’s
time to go fish’in. - Unleash the beast. |
|
| |
|
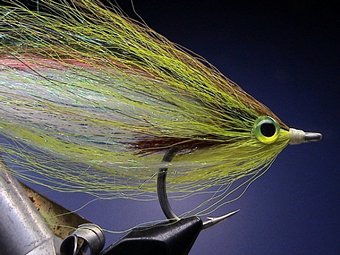
The Angel Deer’est Series - Green
with Envy (Pictured in sequence) |
Materials
Hook: Varivas 990S, 3/0 – 4/0 or 2X equiv.
Thread: Uni-Thread 6/0 white
Tail: White bucktail, Blue Opal Mirage Flashabou
Upper Wing: Angel Hair: (Pearl Green, Silver, Pink,
Chartreuse, Turquoise, Baitfish), chartreuse, and olive
bucktails
Lower Wing: Angel Hair: (Pearl Green, Red), yellow bucktail
Eyes: Chartreuse or silver 3-D, 3/16 dia.
|
|
| |
|
The Angel Deer’est Series -
Atlantic Herring |
Materials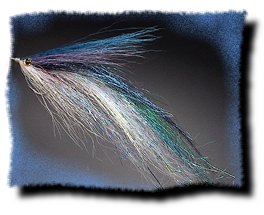
Hook: Varivas 990S, 3/0 – 4/0 or 2X equiv.
Thread: Uni-Thread 6/0 white
Tail: White bucktail, Blue Opal Mirage Flashabou
Upper Wing: Angel Hair: (Pearl Blue, Silver, Blue Ice,
Turquoise, Dark Blue), purple, and silver doctor blue bucktails
Lower Wing: Angel Hair: (Pearl Blue, Red), white bucktail
Eyes: Gold or silver 3-D, 3/16 dia.
|
|
| |
|
|
|
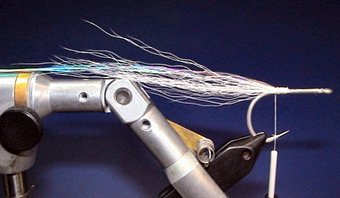 Spiral the thread
around the hook shank starting at the eye and finishing near the
bend. I use the word spiral because I never completely cover the
shank with thread as you would a rod wrap. Leaving open spaces
between thread winds creates crevices for laying slippery
materials along the shank after you fasten it down.
Spiral the thread
around the hook shank starting at the eye and finishing near the
bend. I use the word spiral because I never completely cover the
shank with thread as you would a rod wrap. Leaving open spaces
between thread winds creates crevices for laying slippery
materials along the shank after you fasten it down.
Tie in a small amount of white bucktail over the bend.
Contact with the bucktail along the shank should be about 3/8
inch. First take a series of loose wraps to capsulate the
bucktail and than take a series of hard winds to secure in
place. Tie in four long strands of blue opal Mirage to extend
past the shank about 5 inches. Fold over the left-hand ends and
tie in place. |
|
|
|
Bring back the tying thread to the
bend of the hook. |
|
|
|
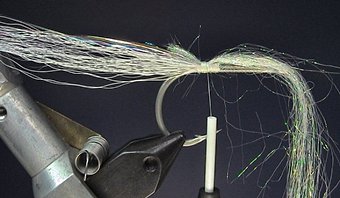
Tying Note:
|
The following procedure will be used for all Angel Hair ties
across the top shank of the hook. When placing the Angel Hair on
the hook, make sure the cut ends face toward the tail of the fly
first. This should be about 3/8 left of the tie in point. Take
about four turns of thread and fasten in place. Fold over the
longer side and extend it over the bucktail. Pull it all back
before tying in place. Take about four turns of thread and
fasten.
You must start at the furthest straight point of shank as
possible to get in all the layers in. Take a small amount of
Pearl Green Angel Hair and tie directly over the bucktail. See
Note above.
|
|
|
|
Advance the thread directly in front
of the previous tie, but not any further. Repeat Step #2 using
the same method and same Pearl Green Angel Hair. Now you should
have a double section of the same color. |
|
|
|
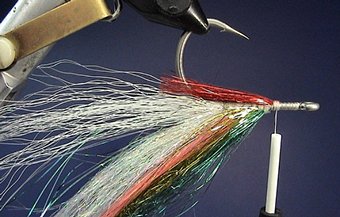
Tie in a small amount of Silver,
Pink, Chartreuse, Turquoise Angel Hair in sequence using the same method
described above. Please take note in advancing the thread at the
beginning of the last tie. Otherwise you will run out of room
for the final bucktail. |
|
|
|
|

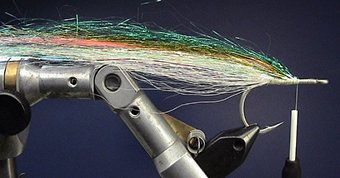
Invert the hook. Tie in a small
amount of Red Angel Hair to extent past the hook bend about ¼
inch. Tie in with four wraps. Fold over the other end of equal
lengths and secure.
|
|
|
|
Tie in a small amount of
Pearl Green Angel Hair. Place the cut ends up to the very bend of the hook.
Tie in with four wraps. Fold over the entire other half and use
the hook point to divide the material equally. You might have to
temporarily remove the hook from the vise for this step. The
long ends should now be blending in to form the lower profile. |
 |
|
|
|
Invert the hook again (regular
position) and tie in the Dark Blue or Baitfish Angel Hair. Follow the Tying
note, but this time when you fold over the material, make sure
the dark blue hair extents the complete length of the fly. Tie
off with a series of four turns. Make two half hitches at this
point and secure the thread. You may at this time have to trim
and form the profile of the fly to suit your purpose and needs. |
 |
|
|
|
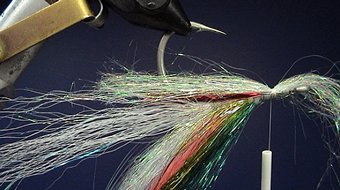
Take a small amount of
chartreuse bucktail and tie in with four loose wraps of thread. Spiral the
bucktail around the top half of the hook. This is going to form
the cage to help restrict the Angel Hair. |
 |
|
|
|
Invert hook. Take a small about of
yellow bucktail and spiral the hair around the lower half. This
will form the bottom cage. Fasten in place. |
|
|
|
|
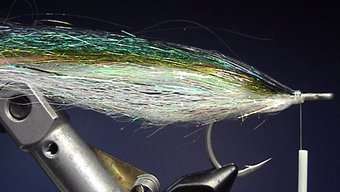
Flip hook to the regular position.
With a small amount of Olive bucktail tie in over
the top, but this time do not spread it out. Finish head and
cement. |
 |
|
|
|
Glue eyes in place using Goop
adhesive. Press firmly in place. A larger profile can be
enhanced by spreading out the material before the addition of
eyes. Bigger eyes will give you more of a spread. |
|
|
|
|
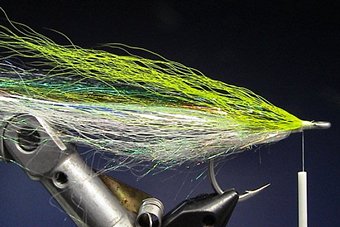
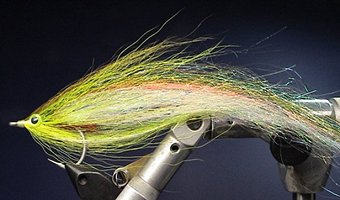
Finished Fly:
Green with Envy
|
|
|
|
ABOUT
THE AUTHOR
 |
Experience
the thrill of saltwater fly fishing and light tackle
angling on the fertile waters of Narragansett Bay, Block
Island Sound, and the pristine waters of Cape Cod with
your host and guide, Captain Ray Stachelek. Visit
him online at Cast-a-fly
charters.com |
|
|
[HOME]
[Fly Tying]
|
|
Copyright
©2000-2003 Flyfishsaltwaters.com
All Rights Reserved
|